Install Connection Center
Cookdown Connection Center is made up of two or more components, a SCOM management pack, and one or more target destinations to push alerts into. During the installation process, you will install our SCOM management pack and a corresponding component to the destination you wish to push your alerts to. The requirements for these destinations do vary so each one has its own installation guide.
Pre-Requisites
Before you get stuck in, you should make sure that you have the following items:
SCOM admin credentials (to install our SCOM Management Pack)
A valid Cookdown product license key
Install the Management Packs
There are two management packs to install into SCOM:
Cookdown Connection Center
Cookdown Licensing (you may already have this from other Cookdown products - but make sure that it is up to date)
Both Management Packs are installed like any other management pack and can be installed following the standard Microsoft import documentation. Many of the Cookdown user interface components are loaded when the console does, so you will need to close and re-open the SCOM console.
Licensing Connection Center
Once installed you will need to license Connection Center in SCOM. If you do not have a license code or an offline license file, please contact hello@cookdown.com to get one.
When selecting one of the Connection Center menu items in the SCOM Administration pane, you will be presented with Licensing actions in the 'Tasks’ pane to the right:
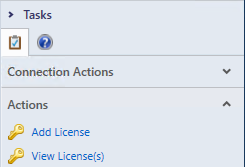
Selecting the ‘Add License' action will start off the Licensing process. Selecting 'View License(s)’ will show a table of all the currently applied licenses (this may require a refresh if recently changed).
Licensing online
Paste your license key into the provided 'License Key' text box
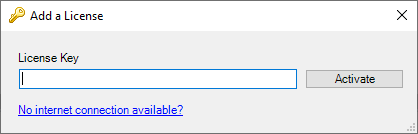
Press the 'Activate' button
You will then be given an acceptance or corrective action notification
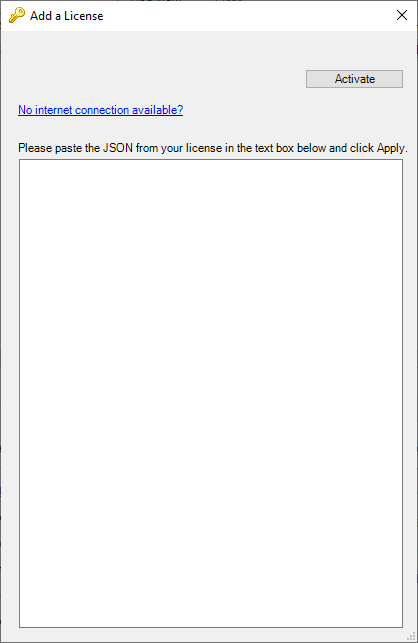
Licensing offline
Select the 'No internet connection available?' link towards the bottom of the licensing window
Paste the contents of your license file into the provided text box (formatting does not matter)
Press the 'Activate' button
Accept the success message or take the corrective action suggested
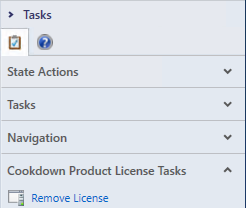
View License(s)
The ‘View License(s)’ option will take you to a table view with all of your available licenses populated. This is a standard SCOM class view, so may need a refresh to catch up with any recent changes (Using F5 or the right-click menu).
Should you need to remove a license for any reason, select the appropriate license in the menu and then use the 'Remove License' task to remove it.
Configure SCOM Authentication/Run-As
Connection center uses standard SCOM Run As Accounts and Profiles. Whilst you will have to create a Run-As Account, we provide you with a Run-as Profile for your destination system out of the box.
Create Run-As Account
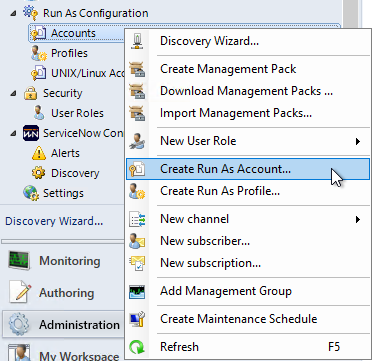
In the SCOM Console open the Administration pane then expand Run As Configuration
Right-click ‘Accounts' and select 'Create Run As Account…’
Under ‘General Properties', set the type of Run as account to ‘Basic Authentication'. Give it an appropriate display name and description
Under credentials enter the credentials required to connect to your destination system
Select the distribution security model you would like to use. We have written this guide assuming that you will use the 'More Secure' option
Check the summary and click 'Create' once you are happy with the Run As Account
Distribute Run As Account
If you selected the 'More Secure' option in the previous section you will need to distribute the new Run As Account:
From the SCOM Administration Pane, expand ‘Run As Configuration', and select 'Accounts’
Find the Run As Account created in the previous section
Right-click on this, select ‘Properties’, then select the 'Distribution' tab
From the ‘Selected Computers' section, press the 'Add’ button
Select your chosen distribution method (we recommend adding the ‘Cookdown Connection Center Resource Pool’) and then OK your way back out
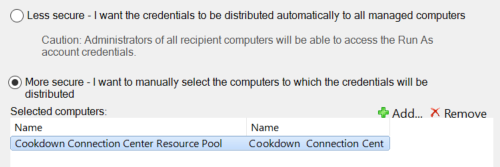
Whilst you can of course distribute this in any way you see fit, we recommend using our Resource pool as this will automatically distribute these credentials to the relevant Management Servers.
Configure Run As Profile
From the SCOM Administration Pane, expand ‘Run As Configuration', and select 'Profiles’
Find the relevant Run As Profile for example the 'Cookdown: Connection Center ServiceNow Account'
Right-click on this and select 'Properties'
Skip through the wizard until you reach the ‘Run As Accounts' page and click the 'Add…’ button
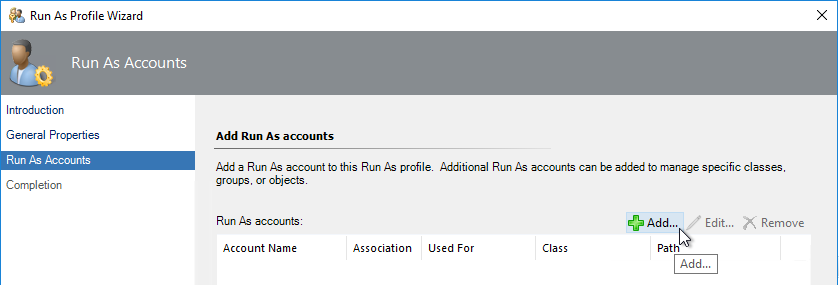
Select the 'Run As Account' created earlier
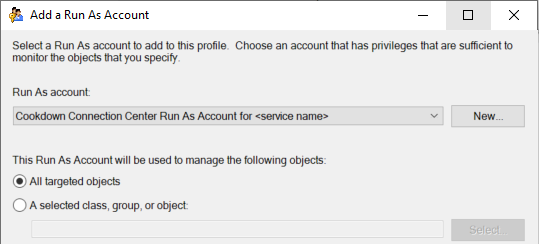
Ensure that ‘All targeted objects’ is selected before clicking 'OK'
Finally press 'Save'
There are a number of different Run-As Profiles included by default, make sure that you select the correct one for your target system.
You can also choose to create and use your own Run-As Profiles, however, these must be stored in a sealed Management Pack to be considered for use by Connection Center. The only exception to this is the Proxy Authentication Run-As Profile, which must be used for Proxy Authentication, but can be scoped as required.
If you are using different Run-As accounts for ServiceNow Notifications and Objects we recommend that you use the Default ServiceNow run-as profile for Objects and a different one for Notifications. Object connections must use the default profile, where Notification connections can be customized. You can use the same profile with careful scoping, but this is more difficult.
Optionally: Modify the Resource Pool Membership
By default, the 'Cookdown Connection Center Resource Pool' is set to automatic membership and contains all of the Management Servers in your Management Group. This has a number of advantages including the same level of high availability that your Management Group is capable of providing, as well as the automatic configuration of any newly commissioned or decommissioned Management Servers. However, should you need to manage this list manually you can do this as follows:
Making a Resource pool have manual membership is a one-way process. The only way to make this automatic again is to remove and then re-import our management pack.
From the SCOM Administration Pane, select 'Resource Pools'
In the list find and select 'Cookdown Connection Center Resource Pool'
Right-click on this, select ‘Manual Membership’, and select 'Yes’ at the warning message
Right-click on this again, select 'Properties'
Next through the wizard until you reach the 'Pool Membership' page
Use the ‘Add’ or 'Remove' buttons to add or remove Management Servers respectively
Press ‘Next' until you are able to press 'Save’
Install Tool-specific Components
The following guides can be used to install the required components into the corresponding destination. If you are not responsible for these tools, you can pass the links over to a colleague and the instructions within will walk them through the required steps in their entirety.
- Set up ServiceNow
- Set up Cherwell
- Set up Slack
- Set up Microsoft Teams
- Set up Webhooks
- Set up Listening Endpoint
After You Finish
At this stage, you should now have all of the relevant components installed for your environment.
Assuming that the tool-specific components are already in place, usually, the next step would be to Configure Outbound Notifications.