Set up ServiceNow
Once you have installed and licensed our SCOM Management Pack, there are two possible ways to use the Cookdown Connector with ServiceNow, with our app from the AppStore, or using the Event Management module.
Set up for Notifications (Alerts/Incidents/Tasks)
Installing the Cookdown app(s)
You can install both our SCOM Connector and Maintenance Mode Apps from the App Store. Once you have completed this you will be able to continue with the setup process. If you have installed both of our Apps you will see Maintenance, Configuration, Alert, and Support menus in your navigation pane.
Creating a service account for SCOM to communicate with
Creating the new account
Navigate to User Administration > Users
Select ‘New’
Create a User ID and password as per your internal practices
Select ‘Submit’
Adding roles to the account
Find the account you just created in the list and re-open
Under 'Roles' select 'Edit'
Add the following roles and save
x_oklt_cookdown_sc.scom_sync_service (for the ability to access the SCOM alert table and for SCOM to handle bi-directional sync)
web_service_admin (for access to ServiceNow’s APIs)
ITIL (needed for interacting with the CMDB for things like CI association)
We discuss the specifics around roles and requirements here.
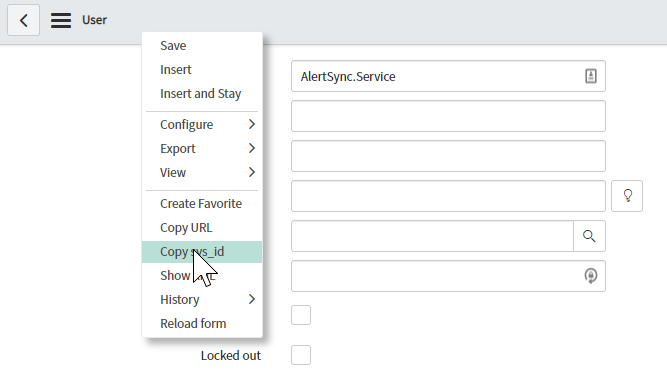
Copying the user sys_id
Whilst you are in the user menu you may also wish to copy the user's sys_id as this will be required in the next step.
Find the account you just created and re-open
Right-click in the grey bar and select 'Copy sys_id'
Configuring the Cookdown Connector App
Setting the default caller
If you have not done so already copy the sys_id of the user account as per the previous step.
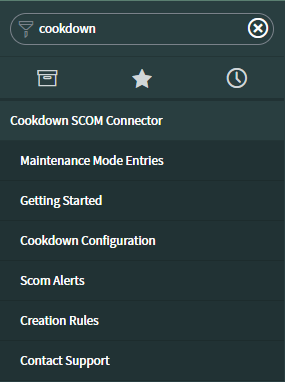
Navigate to Cookdown SCOM Connector > Cookdown Configuration
Paste the sys_id into the first box

Save
Optionally: Configuring SCOM object lookup
If you are using our Discovery product you can configure how that will integrate here.
Navigate to Cookdown SCOM Connector > Cookdown Configuration
Input the CI field you plan to use for lookups in the second box
If the CI field you plan to use for lookups will contain additional data other than just the SCOM Object ID check the 'Allow contains for SCOM Object Id Search' box
Save
Note that the use of contains search is more load intensive on your ServiceNow Instance.
Whilst we provide this functionality, we recommend that you store the SCOM ID in a field by itself.

Optionally: Configuring alert grooming in ServiceNow
If you would like to clean up alerts after a certain number of days:
Navigate to Cookdown SCOM Connector > Cookdown Configuration
In the fourth box set the number of days that you would like to keep alerts for

Save
While there is no charge from ServiceNow for storing more SCOM alerts in your instance, the performance of your instance may start to degrade if you keep hold of a large number of alerts. Work with your ServiceNow representative for expectations on what is reasonable as performance will vary based on your instance's configuration.
Optionally: Set the alert update batch size
Introduced in version 2.2.2 (SCOM 4.0.0.0)
Generally, you shouldn’t need to adjust the alert update batch size. However, if you are in a high-volume environment you may need to increase this limit, or if you are having problems with the number of updates you may need to lower the batch size. To modify this:
Navigate to Cookdown SCOM Connector > Cookdown Configuration
In the fifth box set the number of alerts to limit the update batch size to:

Save
Optionally: Allow non-Admin users to use script fields.
From version 2.2.4 (SCOM 4.0.0.24)
ServiceNow now mandates that all script fields are only adjustable by Admins by default. If the people responsible for Creation Rules are not admin users you may wish to consider adding an Access Control Entry to your Access Control List to allow additional roles to access this field.
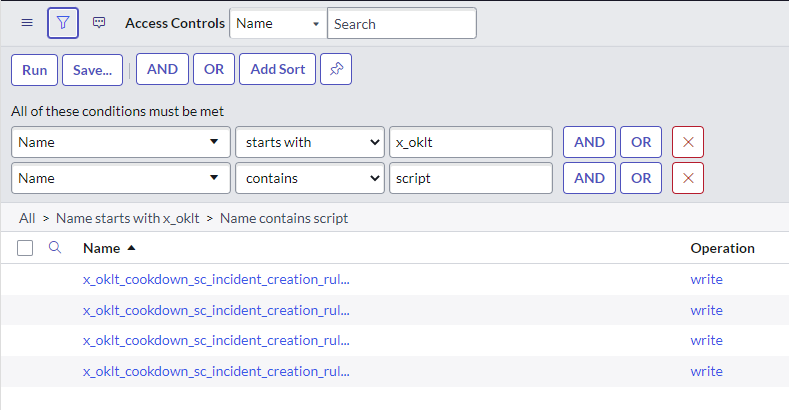
There are (currently) 4 'script' entries that control this. One for each script type. You can adjust, remove, or replace, this as required.
Using Event Management
Creating a service account for SCOM to communicate with
Creating the new account
Navigate to User Administration > Users
Select ‘New’
Create a User ID and password as per your internal practices
Select ‘Submit’
Set up for Objects (CMDB and CIs)
Creating a service account for SCOM to communicate with
As the role requirements for Objects are usually a subset of those required for Notifications, some customers choose to use the same service account for both Objects and Notifications.
Creating the new account
Navigate to User Administration > Users
Select ‘New’
Create a User ID and password as per your internal practices
Select ‘Submit’
Adding roles to the account
Find the account you just created in the list and re-open
Under 'Roles' select 'Edit'
Add the following roles and save
ITIL
In some scenarios, you may also need to add web_service_role
We discuss the specifics around roles and requirements here.
Set up a Discovery Source
In order for Configuration Items (CIs) from Cookdown object connections to be identifiable as created from/enriched by SCOM a specific 'Discovery Source' must be configured in your ServiceNow Configuration Management Database (CMDB). The Discovery Source that you create/use should be passed to the SCOM Admin.
To do this we need to add a record to the discovery_source column of the cmdb_ci table in the ‘Dictionary Entries' (or 'sys_dictionary’) table. This requires admin permissions in ServiceNow. There are a number of different ways to get at this value (ultimately these all just create a new record in the same place, with the same configuration), we feel the simplest ways are as follows:
Directly on the sys_choice table
In the ‘Filter navigator’ search field enter sys_choice.list
On the 'Choices' table the loads, create a new record

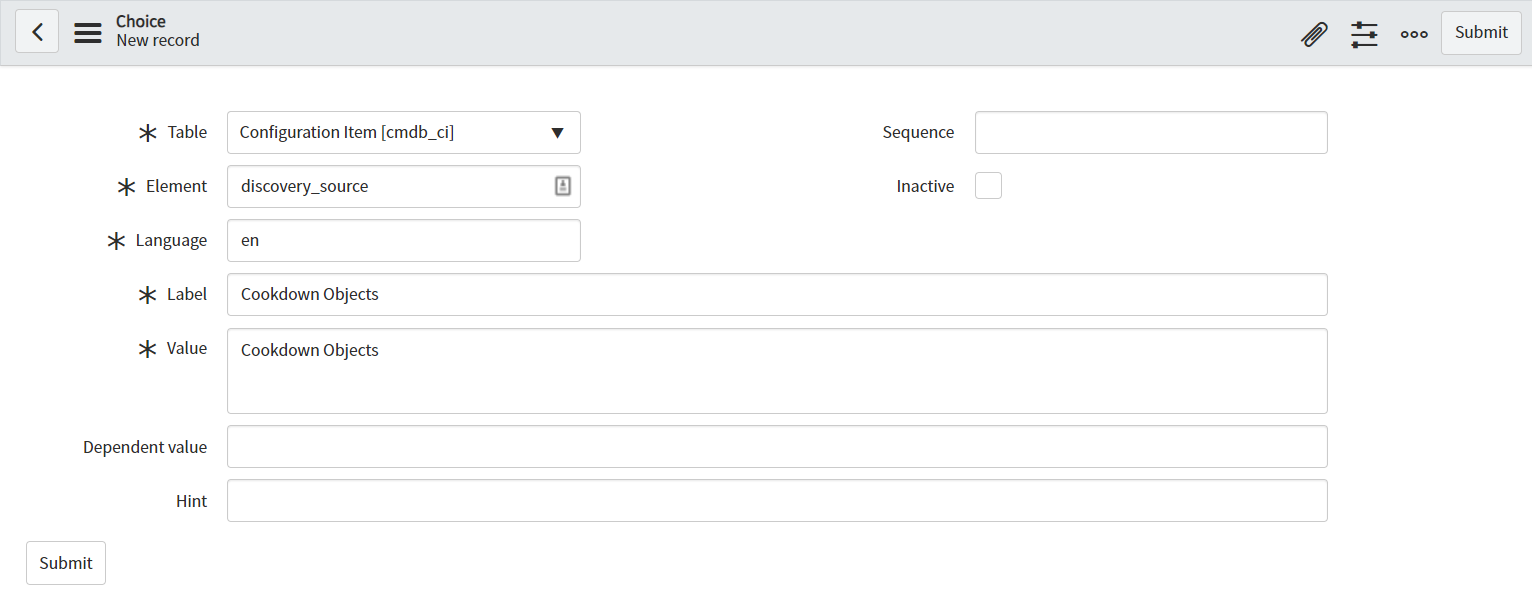
Table - Configuration Item [cmdb_ci]
Element - discovery_source
Language - en
Unless you have reason to add additional languages
Label - Cookdown Objects
Though you can set this to any label you wish (e.g. SCOM Objects, Cookdown Discovery, etc.)
Value - Cookdown Objects
Though you can set this to any label you wish (e.g. SCOM Objects, Cookdown Discovery, etc.)

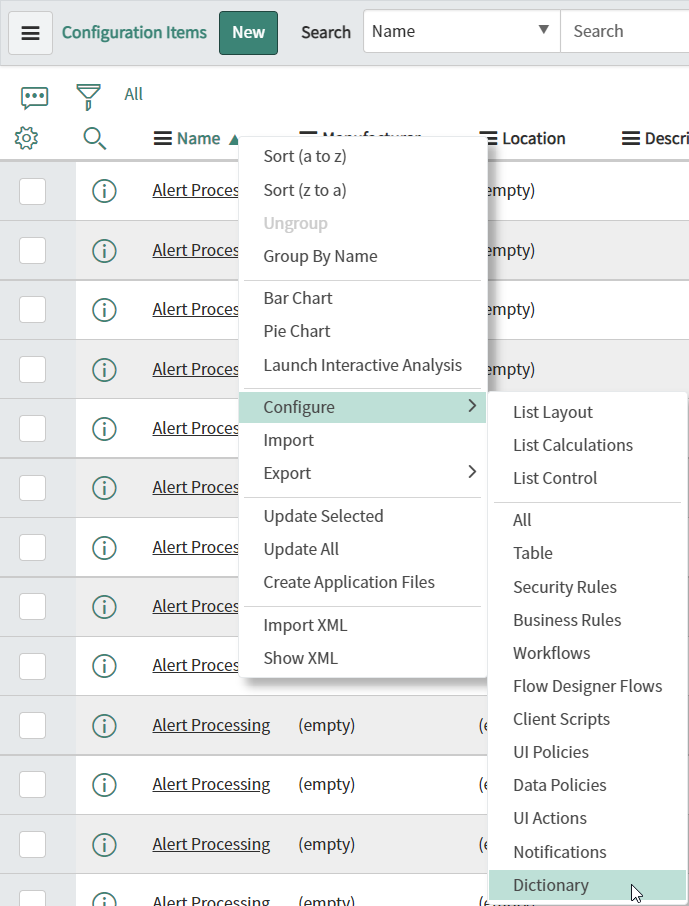
Via the cmdb_ci table
In the ‘Filter navigator' search field enter cmdb_ci.list
Right-click a column header, go to 'Configure', and select Dictionary
Find and select the 'discovery_source' link label
This can usually be found on page 2 if you have the default ‘rows per page’
You can also adjust the pre-built filter to look for this column name
Select the Choices tab
Select New
Label - Cookdown Objects
Though you can set this to any label you wish (e.g. SCOM Objects, Cookdown Discovery, etc.)
Value - Cookdown Objects
Though you can set this to any label you wish (e.g. SCOM Objects, Cookdown Discovery, etc.)
Optionally: Configure ServiceNow for Application sync
If you wish to use application sync to link objects to distributes or enterprise applications in SCOM you may be required to implement identification rules/entries for any of the service classes that you wish to use (typically business/technical/application services).
In newer versions of ServiceNow 'Business Service' has been renamed 'Service' and in some instances already has a similar (but not identical) identification rule.
The following is a recommendation from us only, it is up to you how you implement your CMDB. Before setting up any of the following we suggest that you review how existing discovery tools interact with Services in case you create rules that prevent their operation.
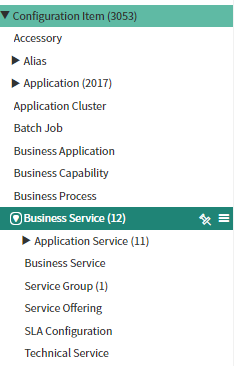
In ServiceNow's CI Class Manager tool you will notice that all service classes are inherited from the ‘Service' or 'Business Service’ class (depending on the version). If you are planning on using multiple service classes this makes it the best place to insert our identification rule.
Creating the identification rule
1. Navigate to the ‘CI Class Manager', click ‘Open Hierarchy’, search for ‘Service’ to find the parent class, and then click ‘Identification Rule’. This may be labeled ‘Business Service’, 'Service’, or possibly something else if this has been customized.
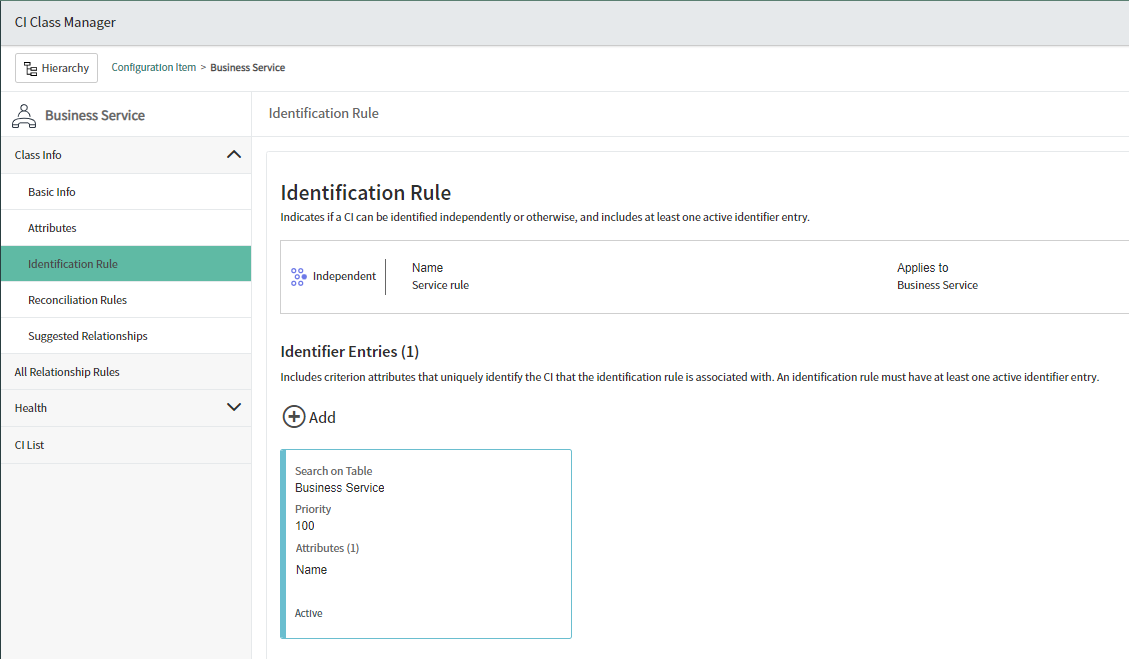
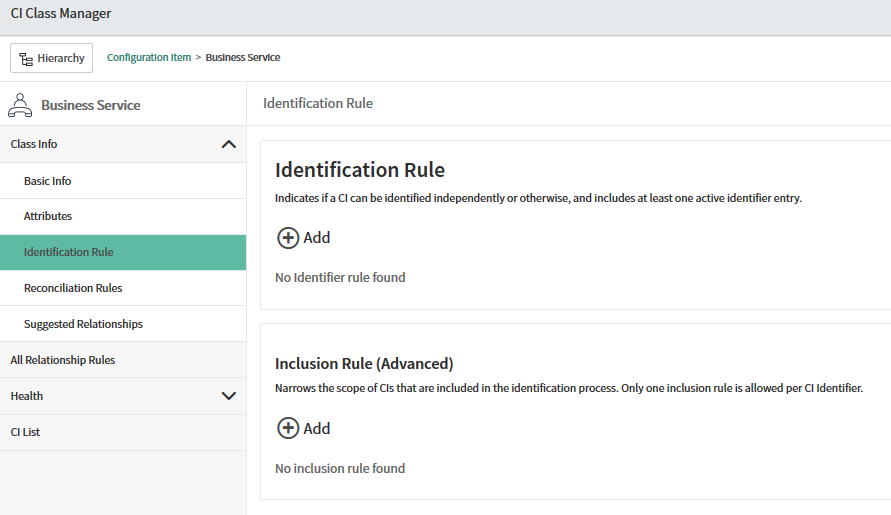
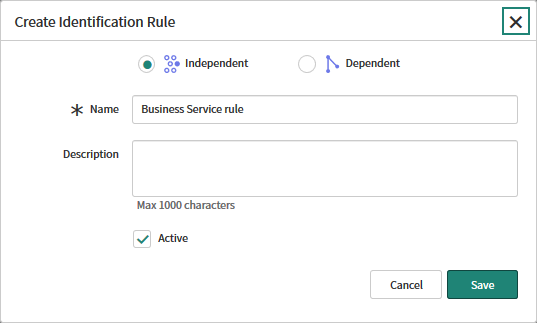
2. If there is no Identification Rule in place (as seen in the image above right), insert a new one using the add button. Set this to be ‘Independent', set the name and description to something sensible, make sure this is set to be ‘Active’, and finally select 'Save’.
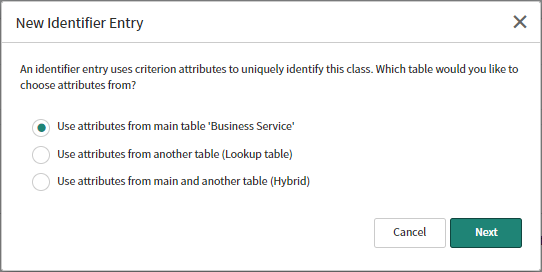
3. Click ‘Add' under ‘ Identifier Entries’, select 'Use attributes from main table', and select next.
4. Ensure the entry is marked as ‘Active', set an appropriate priority (if your instance already has an identification rule on just the ‘Name' attribute, make it more important than that one), and finally select the ‘Name’ and ‘Correlation ID’ (unless you have chosen a different field under the Configuring object lookup step) attributes selected.
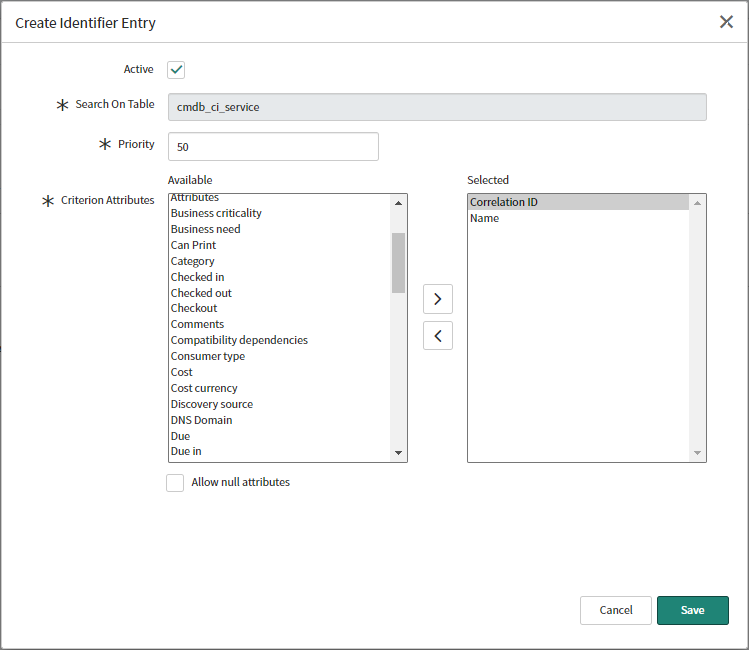
SCOM doesn’t enforce uniqueness among names, it uses an object id instead (in a similar manner to ServiceNow's sys_id). We have come across scenarios (particularly around Enterprise Application groups) where collisions can occur if the object id is not also taken into account. We recommend that you do this whether you are using our notification product or not.
ServiceNow’s identification and reconciliation engine will now accept incoming CIs from SCOM (or any other discovery source) which contain name and correlation id.
Further Reading and Next Steps
You should now have a service account to use in SCOM and the requirements to get going with Connection Center in ServiceNow. Your next step should be to:
Understand the Roles in ServiceNow
If you are also responsible for SCOM you can now proceed to:
Configure Outbound Notifications
Configure Inbound Notifications
If this is your first time using the ServiceNow CMDB there are other ServiceNow configuration steps that you may wish to look at that are not strictly related to Cookdown Objects. Staleness and Orphan rules, for example, can help you keep your CMDB in good health (as described here). If you have other discovery sources you may wish to use 'Reconciliation Rules' to set the priority of each source. There are many different options to make managing your CMDB easier, so we would recommend that you take a look at the ServiceNow CMDB documentation to help you with this task (or at least get a feel for what is possible).