Installation and Setup - Alert Sync
Cookdown Alert Sync for ServiceNow is made up of two pieces, a SCOM management pack and a ServiceNow app. They are installed and configured to talk to each other to sync Alerts and raise Incidents.
Pre-Requisites
Before you get stuck in make sure you have the following:
A valid Cookdown Alert Sync product license key
A ServiceNow service account that SCOM can use to connect to ServiceNow with
ServiceNow admin credentials (to install the ServiceNow app with)
SCOM admin credentials (to install the SCOM MP with)
Installation
SCOM
There are two management packs to install into SCOM:
Cookdown ServiceNow Connector
Cookdown Licensing
Both Management Packs are installed like any other management pack following the standard Microsoft import from disk steps here. After installation, close and re-open the SCOM console.
Note that the Cookdown ServiceNow Connector contains multiple products (Alert Sync and Discovery) and what is available to use depends on what you have a license activated for and that the Licensing Management Pack is shared between all Cookdown products that are licensed in SCOM. This means that if you already have a copy of the Cookdown Licensing and/or Cookdown ServiceNow Connector Management Packs installed you have nothing else to install into SCOM.
ServiceNow
The Cookdown SCOM Connector app is a free download from the ServiceNow App Store. Install it from there. Direct link to Store app.
Info
The Cookdown SCOM Connector adds 3 tables. From Madrid onwards, ServiceNow license additional tables added to your instance so may charge you for their addition, but typically a table allocation is included in your ServiceNow ITOM or ITSM subscription. For more info contact your ServiceNow representative.
Configuration
Once installation has been completed you will need to configure both systems as outlined in the following articles:
Testing
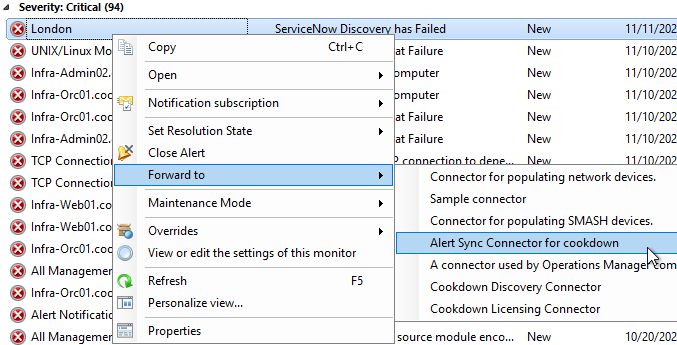
If all previous stages have been completed you should now be in a position to test Alert Sync. Enable Standard and/or Event Management from the Global connector settings. If you have a subscription set up already Alert Sync will start to forward matching alerts to ServiceNow. If you do not have a subscription set up or have no matching alerts currently you can still forward an alert manually.
Forwarding an Alert Manually
From the 'Monitoring' pane in the SCOM console select a view that will show you an alert
'Active Alerts' for example
Select and then right click on an Alert
From 'Forward to' select the Alert Sync Connector created earlier
Optionally: Personalize your View
Whilst not necessary, personalizing your view in SCOM to show some extra columns can help provide some insight as to what is happening with your alert forwarding:
From the 'Monitoring' pane in the SCOM console select a view that will show you some alerts that you will be testing with
'Active Alerts' for example
From the ‘Tasks' pane to the right, select the ‘Personalize’ action from 'Alert Actions’
If not using Bidirectional Sync enable
Connector
Forwarding Status
Last Modified By
If using Bidirectional Sync additionally enable
Ticket ID
Owner
Custom fields 1-5
Select OK
View Alerts in ServiceNow
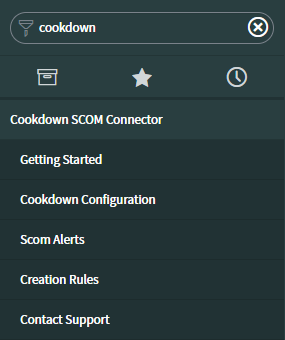
Once the sync interval has elapsed you should start to see Alerts appear in ServiceNow. Select ‘Scom Alerts' from the 'Cookdown SCOM Connector’ section:
If you do not see this option you may be missing some user roles or, if you have only just installed the Cookdown ServiceNow App, you may need to logout and back in again.
If you are pushing alerts manually you may find it beneficial to use the cog wheel to enable the 'Created' column which will allow you to quickly see and sort Alerts in the order that you pushed them up in. Please bite that Created refers to the time and date that the alert was created in ServiceNow as opposed to Time Raised which refers to the time and date the alert was raised in SCOM.
If you have configured the test creation rule as per ServiceNow Setup these alerts should be associated with a ‘Created Record’. We go further into Creation Rules here.


